This information is provided as a public service. No warranty, expressed or implied, is offered for the following instructions. Use at your own risk; your mileage may vary. (so many lawyers, so few bullets!)
Having said that, let's get started. Oh, yes, these instructions are based on Windows NT Workstation 3.51. As far as I know, it should work the same with NT Server 3.51 and the NT 4.0 betas... but it's only been tested on Workstation 3.51.
You should already have installed RAS and TCP/IP on your machine, as well as configured your modem. If not, go to the Control Panel, select the Network Icon, and locate the necessary evils under the "Add Software" dialog. It may also be helpful to install the "Simple TCP/IP Services" package.
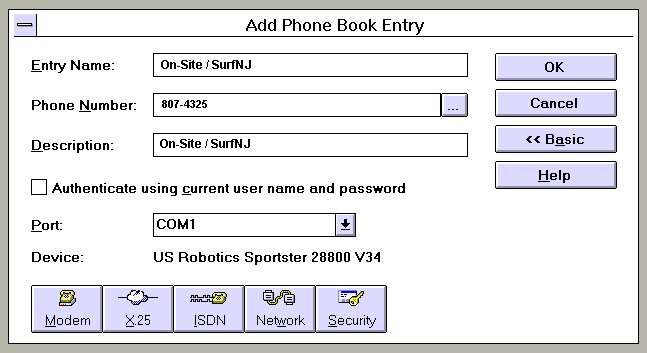
To start the configuration of RAS, start RAS (Remote Access Service). If this is the first time you've started RAS, it will tell you that you have no dial entries, and prompt you to create one. Otherwise you'll need to add an entry for On-Site / SurfNJ. You should fill out the "Add Phone Book Entry" dialog as shown below... but substitute your local POP number where I've entered the Somerville number. The description field is optional.

Make certain you de-select the checkbox for "Authenticate using current user name and password." By default, RAS will select this for you. You should also make certain the modem device and port are correct. If you haven't installed a modem yet, you'll need to exit RAS (keep pressing Cancel) and go back to the Control Panel to add the modem. Otherwise, the next thing to do is: Press the "Modem" button to bring up this screen.
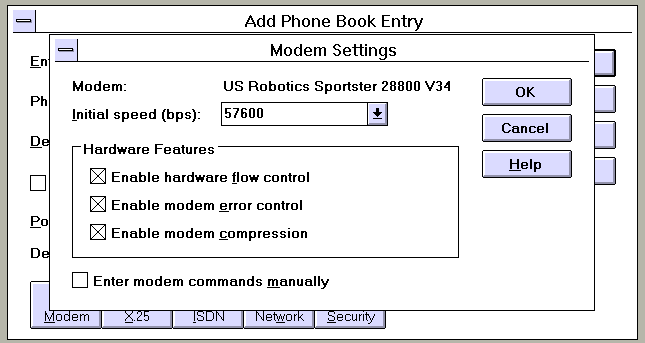
Set your modem parameters. All three checkboxes can be safely used with On-Site / SurfNJ. You should set speed to the highest bit rate your system can handle. When you're satisfied, click on "OK" to go back to the "Add Entry" screen.
Next you need to set Network protocols. Click on the "Network" button to bring up the next screen. RAS, in it's finite wisdom, thinks the whole world revolves around NetBEUI. It doesn't. You'll need to deselect the NetBEUI checkbox. For On-Site / SurfNJ, always select PPP protocol. The RFC 1570 seems to work just fine.
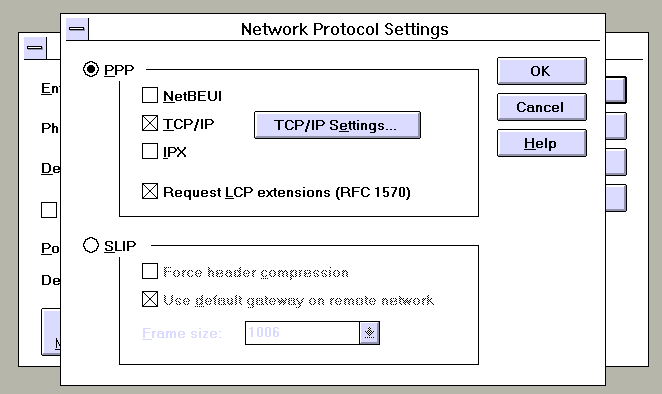
Now you have to set the TCP/IP parameters for On-Site / SurfNJ. Press the "TCP/IP Settings" button to move on to this screen.
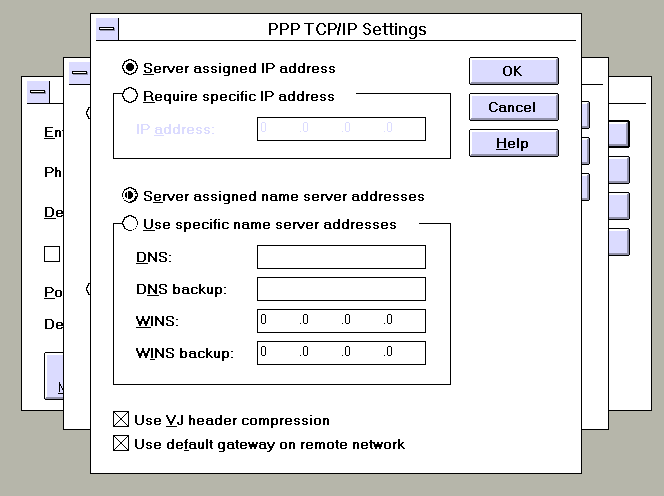
And type in the entries as shown above. If you have a Static IP address assigned, select "Require specific IP address" and type in your assigned address. Click on "OK" when complete to go back to the "Network Protocol" dialog; select "OK" again to put it safely away.
Now you're ready for the fun part: logging in. There are really two ways to handle this, based on your preferences (and level of paranoia). For best security, use the "Terminal" login facility and always type in your username and password manually. For ease of use, construct a script.
To make a script you'll need to use the Notepad editor to modify the RAS command file SWITCH.INF. This file is normally located at %SystemRoot%\System32\RAS\SWITCH.INF (C:\WINDOWS\System32\RAS\SWITCH.INF for most users). At the top of SWITCH.INF is the typical Microsoft pseudo-documentation regarding scripting. Down at the end of the file, add a section like this:
; On-Site / SurfNJ Internet Login Script
[On-Site / SurfNJ]
COMMAND=
OK=<match>"ogin:"
LOOP=<ignore>
COMMAND=USERNAME<cr>
OK=<match>"assword:"
LOOP=<ignore>
COMMAND=PASSWORD<cr>
OK=<ignore>
;== Script Ends ==
You'll need to add your actual user name where the sample has "USERNAME" and
your real password instead of "PASSWORD". Save the file. You'll need to shut
down and restart RAS in order for the script to be available.
IMPORTANT NOTE: Your user name and password are stored as unencrypted ASCII text in the SWITCH.INF file. This means anyone with access to your computer may read these values.
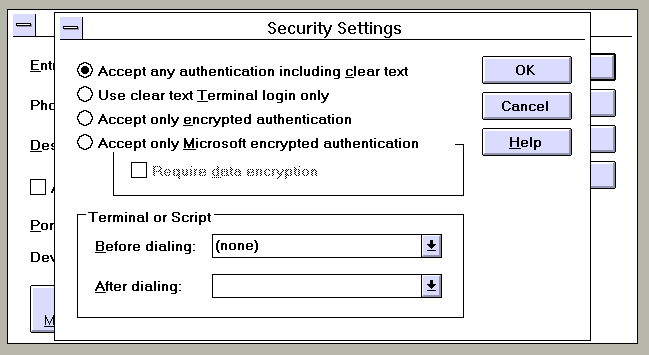
Now, back to RAS to enable the script. Under security settings set your screen similar to below; use the name you picked for your login script for the "After dialing" script entry. "WoodallCOM" is the name of my script...
Save it by clicking OK, then click OK on the Add/Edit Entry screen, and you should be ready. Now RAS should display something similar to this:
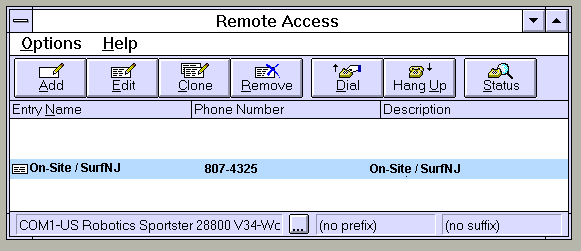
At which point you can just use the "Dial" button and crank it up.
When you press dial, RAS will display the "Authentication" dialog; clear ALL fields and press OK. You'll be on like a flash!
This page provided courtesy of

On-Site Computer Service, Inc © 1998
732-774-7181
Last Updated 07/16/13