

Network and Dialup Configuration For On-Site / SurfNJ Internet Customers
[Suggestion: This step procedure should be printed-out
and followed while actually performing the setup. You can view a format of these
instructions for printing without the graphics by clicking
here.]
Note: In the following discussion, click means to click the LEFT mouse
button, right click means to click the RIGHT mouse button.

 The first thing to do is double-click the My Computer
icon. If there isn't a Dial-Up Networking icon, click here.
If there is, then skip step 2 by clicking here.

 To install Dial-Up Networking,
double-click Add/Remove Programs in the Control Panel which is in My
Computer. A window will come up with three tabs. Click the 'Windows Setup' tab
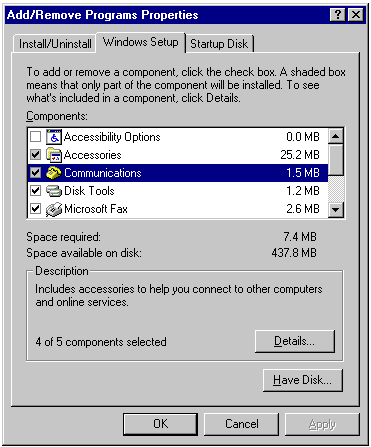
Double-click Communications and a window will appear. Put a check in the Dial-Up
Networking box:
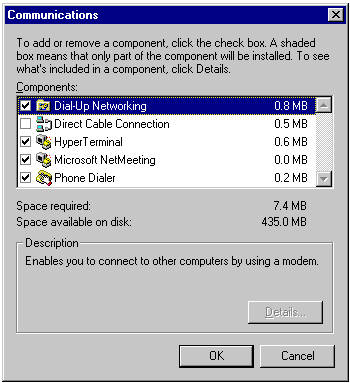
Click 'Ok' for the Comminications window, then 'Ok' for the Add/Remove Programs
window. You might need your 'Windows95 CD-ROM' so your computer can copy the necessary
files. Once your computer finishes copying files close your My Computer window and
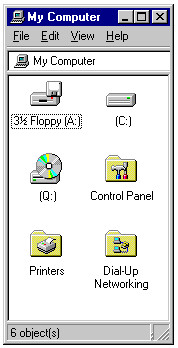
reopen it. There should now be a Dial-Up Networking icon in your My Computer
window:
Proceed to step 3.

![]() Double-click Dial-Up Networking. A window will
appear with either a 'Welcome to Dial Up Networking...' message or a Make New
Connection icon.
Double-click Dial-Up Networking. A window will
appear with either a 'Welcome to Dial Up Networking...' message or a Make New
Connection icon.
Once the Setup Wizard is complete, an On-Site / SurfNJ icon will be in
your Dial-Up Networking window.
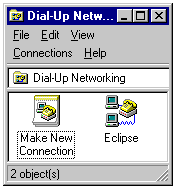
You must now right-click the On-Site / SurfNJ icon an a pop up menu will appear.
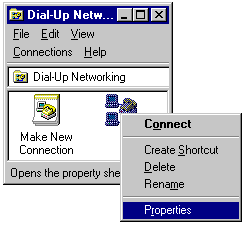
Click 'Properties' and an On-Site / SurfNJ window will appear. Click the Server Types
tab or button (it's a button if you have an older version of Windows95)
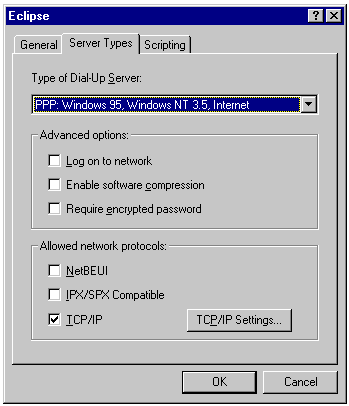
Under 'Advanced Options' only 'Log on to Network' should be checked.
Under 'Allowed Network Protocols' only 'TCP/IP' should be checked.
Now click the TCP/IP Settings button
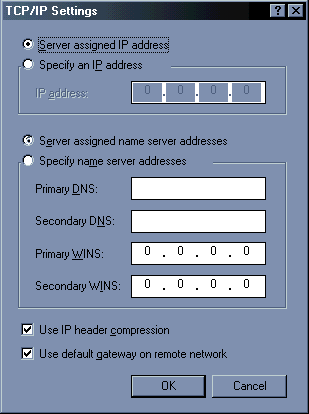
There should be a dot next to 'Server assigned IP address' and a dot next to 'Specify name
server addresses'. The 'Primary DNS' field should have the number 207.207.192.8 and the
'Secondary DNS' field should have the number 207.207.208.10. 0.0.0.0 should be in the
Primary and Secondary WINS fields and 'Use IP header compression' and 'Use default gateway
on remote network' should be checked. Click 'OK' out of TCP/IP Settings and 'OK'
out of the remaining open windows until you see the Dial-Up Networking window
again. Once again right-click the On-Site / SurfNJ icon and click 'Create
Shortcut' and a window will appear

Click 'Yes' and an icon will be on your desktop.
Close Dial-Up Networking and proceed to step 4.

![]() In the My Computer window double-click the Control
Panel icon to open the Control Panel window.
In the My Computer window double-click the Control
Panel icon to open the Control Panel window.
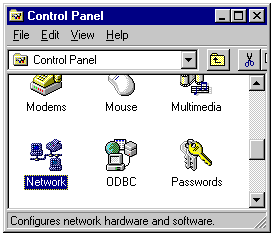
![]() In the Control Panel window
double-click the Network icon.
In the Control Panel window
double-click the Network icon.
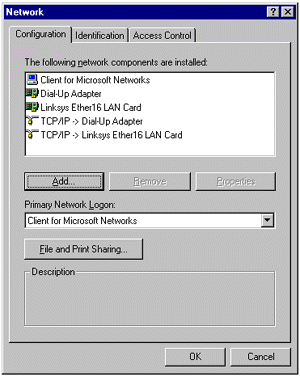
Under 'The following network components are installed' look for 'Dial-Up adapter' and
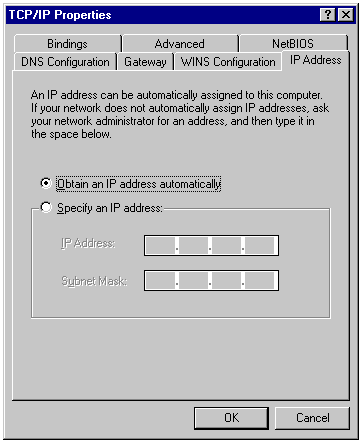
'TCP/IP'. Double-click 'TCP/IP' and a 'TCP/IP Properties' window will appear with
tabs. Under the 'IP Address' tab, there should be a dot next to 'Obtain an IP address
automatically'.
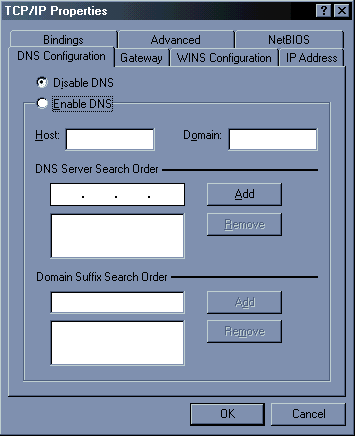
Click the 'DNS Configuration' tab and click on 'Enable DNS'. Under 'Host' anything can be
in the field, but it must be all lower cased. For 'Domain' type 'surfnj.net'. Go down to
the 'DNS server search order' and to the left of the 'Add' button type 207.207.192.8 and
click 'Add'. The number you typed should now be in the bigger box below. In the same place
where you typed the previous number, type 207.207.208.10 and click 'Add' again. Finally,
go down to 'Domain suffix search order' and to the left of the 'Add' button type
'surfnj.net' and click 'Add'.
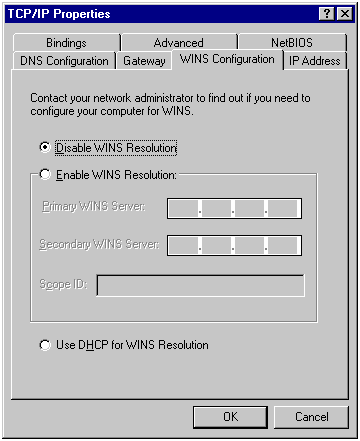
Finally, click the 'WINS configuration' tab and 'Disable WINS resolution' should be
dotted.
The other tabs are of no importance so you can leave them the way
they are. If you want to see how they might look click here.
Click 'OK' out of TCP/IP Properties and 'OK' out of the Network window. Your
computer should be copying files and will ask you to restart. Click 'Yes' to resarting
your computer.
Once your computer is finished booting up, double-click the Shortcut to On-Site /
SurfNJ icon. Fill in you username and password and click the 'Connect' button. Once
connected double-click your Internet Explorer icon which is the globe with the
magnifying glass usually called 'The Internet' or your Netscape icon if you have
Netscape. From here you can surf the Internet.

On-Site Computer Service, Inc © 1998
732-774-7181
Last Updated 07/16/13